Windows Terminal 完美配置 PowerShell 7.1
Windows Terminal 完美配置 PowerShell 7.1
1. 安装 Windows Terminal
- 这一步对大多数人不构成任何困难,去 Microsoft Store 搜索下载就是了。
2. 安装字体
- Hack Nerd Font Mono 该字体支持 ligature 连字功能,而且是一款专门为代码显示准备的字体,该字体也支持很多有趣的特殊字符,非常适合在终端里使用。 点击去下载
3. 安装新款 Powershell Core
-
在 https://github.com/PowerShell/PowerShell/releases 这个GitHub 链接里,有目前 Powershell 的最新版,我建议你从 release 里选个最新的 preview 版本。经过测试,这些预览版都相当稳定。
4. 安装 Powershell 插件
这一步是灵魂。
直接上代码:打开刚装好的新版 powershell,逐行输入命令。
# 1. 安装 PSReadline 包,该插件可以让命令行很好用,类似 zsh
Install-Module -Name PSReadLine  -Scope CurrentUser

# 2. 安装 posh-git 包,让你的 git 更好用
Install-Module posh-git  -Scope CurrentUser

# 3. 安装 oh-my-posh 包,让你的命令行更酷炫、优雅
Install-Module oh-my-posh -Scope CurrentUser
安装过程可能有点慢,好像卡住了一样,但是请耐心等待几分钟。等不及的同学自行搜索科学方法访问 GitHub.
5. 添加右键菜单
Github 上面已经有 powershell 脚本了,可以用管理员身份运行该脚本 + 某些参数以实现配置右键菜单。
我修改后的脚本仓库 (建议用这个)
建议下载我这个,然后在管理员模式的 powershell 7 里运行:
.\install.ps1 mini
记住一定要以管理员身份在 powershell 7 里面运行该脚本。
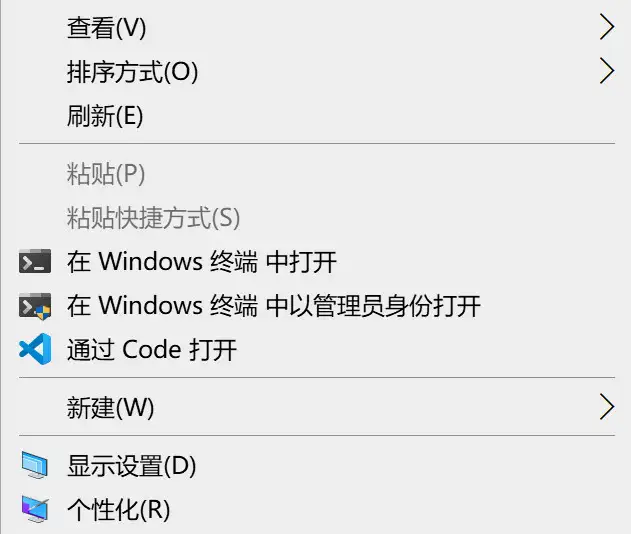
目前发现问题:该脚本会读取 Windows Terminal 的 profile,然后把其中的非隐藏项目添加到右键菜单(默认视图),这之后如果你修改了 profile,那么需要用 uninstall.ps1 脚本先清除右键菜单,然后重新 install 一遍。
6. 添加 Powershell 启动参数
在 powershell 中输入
notepad.exe $Profile
紧接着在弹出的页面中输入下面这一长串代码,保存并关闭。文件是控制启动前参数的。
注意:将 ‘$themePath’ 替换为自己的主题路径。这是我自用的配置效果如下:

更多主题可以访问 oh-my-posh 官方文档:点击空降
<#
 * FileName: Microsoft.PowerShell_profile.ps1
 * Author: 刘 鹏
 * Email: littleNewton6@outlook.com
 * Date: 2021, Aug. 21
 * Copyright: No copyright. You can use this code for anything with no warranty.
#>

#------------------------------- Import Modules BEGIN -------------------------------

# 引入 posh-git
Import-Module posh-git

# 引入 oh-my-posh
Import-Module oh-my-posh

# 引入 ps-read-line
Import-Module PSReadLine

# PowerShell 主题 的地址
$themePath = "C:\ProgramData\Microsoft\Windows\Start Menu\Programs\PowerShell\on-my-posh\catppuccin_frappe.omp.json"

# 设置 PowerShell 主题
# Set-PoshPrompt ys
Set-PoshPrompt $themePath
#------------------------------- Import Modules END   -------------------------------


#-------------------------------  Set Hot-keys BEGIN  -------------------------------
# 设置预测文本来源为历史记录
Set-PSReadLineOption -PredictionSource History

# 每次回溯输入历史,光标定位于输入内容末尾
Set-PSReadLineOption -HistorySearchCursorMovesToEnd

# 设置 Tab 为菜单补全和 Intellisense
Set-PSReadLineKeyHandler -Key "Tab" -Function MenuComplete

# 设置 Ctrl+d 为退出 PowerShell
Set-PSReadlineKeyHandler -Key "Ctrl+d" -Function ViExit

# 设置 Ctrl+z 为撤销
Set-PSReadLineKeyHandler -Key "Ctrl+z" -Function Undo

# 设置向上键为后向搜索历史记录
Set-PSReadLineKeyHandler -Key UpArrow -Function HistorySearchBackward

# 设置向下键为前向搜索历史纪录
Set-PSReadLineKeyHandler -Key DownArrow -Function HistorySearchForward
#-------------------------------  Set Hot-keys END    -------------------------------


#-------------------------------    Functions BEGIN   -------------------------------
# Python 直接执行
$env:PATHEXT += ";.py"

# 更新系统组件
function Update-Packages {
	# update pip
	Write-Host "Step 1: 更新 pip" -ForegroundColor Magenta -BackgroundColor Cyan
	$a = pip list --outdated
	$num_package = $a.Length - 2
	for ($i = 0; $i -lt $num_package; $i++) {
		$tmp = ($a[2 + $i].Split(" "))[0]
		pip install -U $tmp
	}

	# update TeX Live
	$CurrentYear = Get-Date -Format yyyy
	Write-Host "Step 2: 更新 TeX Live" $CurrentYear -ForegroundColor Magenta -BackgroundColor Cyan
	tlmgr update --self
	tlmgr update --all

	# update Chocolotey
	Write-Host "Step 3: 更新 Chocolatey" -ForegroundColor Magenta -BackgroundColor Cyan
	choco outdated
}
#-------------------------------    Functions END     -------------------------------


#-------------------------------   Set Alias BEGIN    -------------------------------
# 1. 编译函数 make
function MakeThings {
	nmake.exe $args -nologo
}
Set-Alias -Name make -Value MakeThings

# 2. 更新系统 os-update
Set-Alias -Name os-update -Value Update-Packages

# 3. 查看目录 ls & ll
function ListDirectory {
	(Get-ChildItem).Name
	Write-Host("")
}
Set-Alias -Name ls -Value ListDirectory
Set-Alias -Name ll -Value Get-ChildItem

# 4. 打开当前工作目录
function OpenCurrentFolder {
	param
	(
		# 输入要打开的路径
		# 用法示例:open C:\
		# 默认路径:当前工作文件夹
		$Path = '.'
	)
	Invoke-Item $Path
}
Set-Alias -Name open -Value OpenCurrentFolder
#-------------------------------    Set Alias END     -------------------------------


#-------------------------------   Set Network BEGIN    -------------------------------
# 1. 获取所有 Network Interface
function Get-AllNic {
	Get-NetAdapter | Sort-Object -Property MacAddress
}
Set-Alias -Name getnic -Value Get-AllNic

# 2. 获取 IPv4 关键路由
function Get-IPv4Routes {
	Get-NetRoute -AddressFamily IPv4 | Where-Object -FilterScript {$_.NextHop -ne '0.0.0.0'}
}
Set-Alias -Name getip -Value Get-IPv4Routes

# 3. 获取 IPv6 关键路由
function Get-IPv6Routes {
	Get-NetRoute -AddressFamily IPv6 | Where-Object -FilterScript {$_.NextHop -ne '::'}
}
Set-Alias -Name getip6 -Value Get-IPv6Routes
#-------------------------------    Set Network END     -------------------------------
添加完主题后输入以下命令更新:
. $PROFILE
一切,非常完美。
7.更多美化 Windows Terminal美化之显示icon(可选)
- 安装Terminal-Icons
安装命令
Install-Module -Name Terminal-Icons -Repository PSGallery
- 加入 Powershell 自定义配置里面,实现启动terminal自动加载
notepad $PROFILE
- 写入下面的内容
Import-Module -Name Terminal-Icons
- 保存并关闭
- 更新文件
. $PROFILE
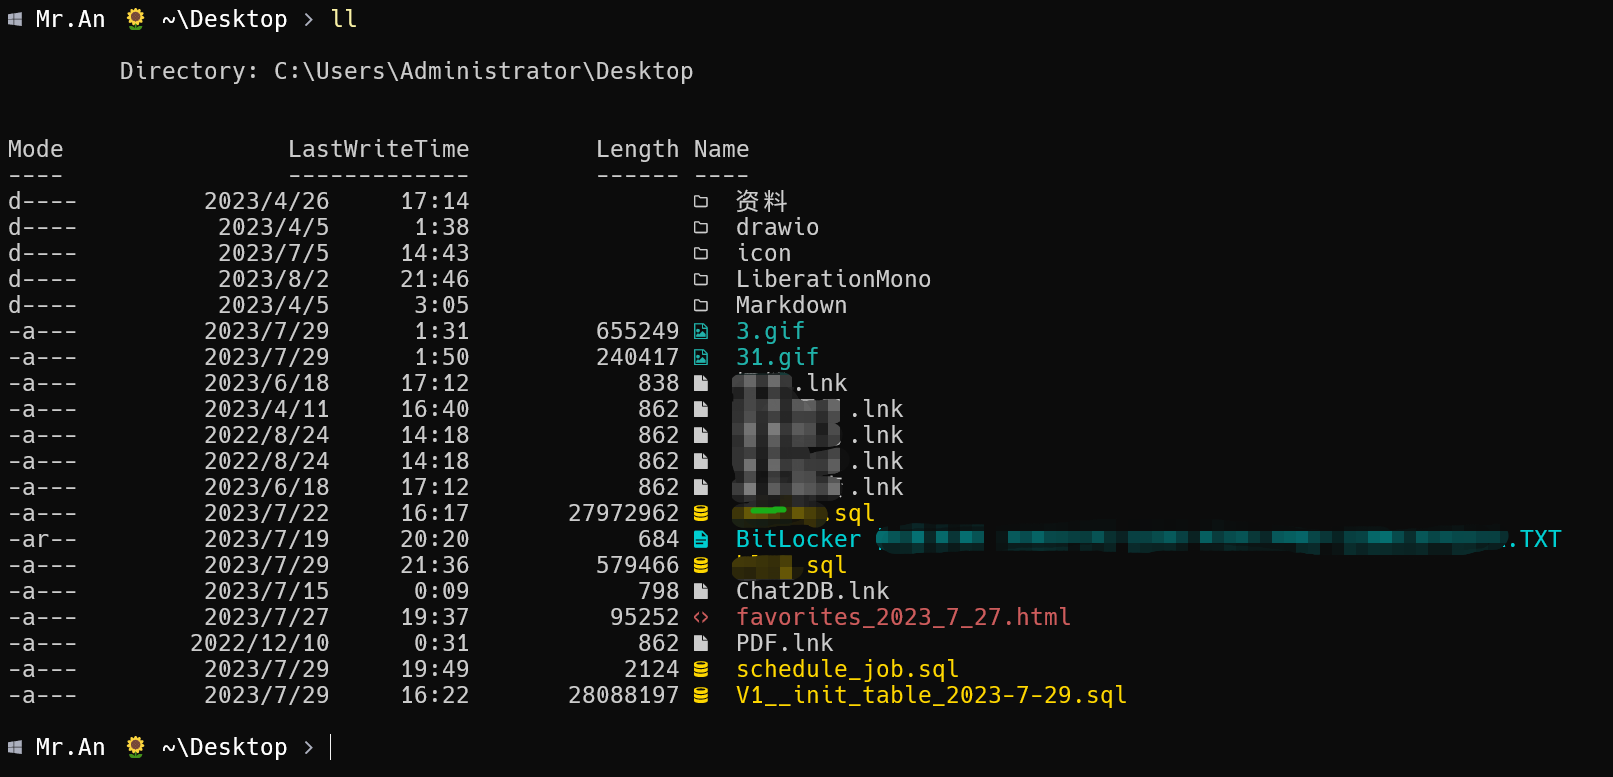
效果如图:

感谢
结束~

- 感谢你赐予我前进的力量
-
 微信
微信  支付宝
支付宝
赞赏者名单
因为你们的支持让我意识到写文章的价值🙏
阅读建议


评论
隐私政策
你无需删除空行,直接评论以获取最佳展示效果